15 Best Halloween Cookies for a Spooky Sweet Table
Quick Answer: The best Halloween cookies range from five-minute no-bake Oreo spiders to showstopping meringue ghosts, with plenty of easy sugar cookies, pumpkin-spiced favorites, and nut-free options in between. This roundup has 15 complete recipes sorted by skill level, so there’s a match for a rushed Tuesday night or a full weekend of baking.
Halloween baking season has a way of showing up faster than expected — one minute it’s a school flyer about a class party, the next you’re staring at a bag of flour wondering what you signed up for. Whatever brought you here, these cookies are built to solve it.
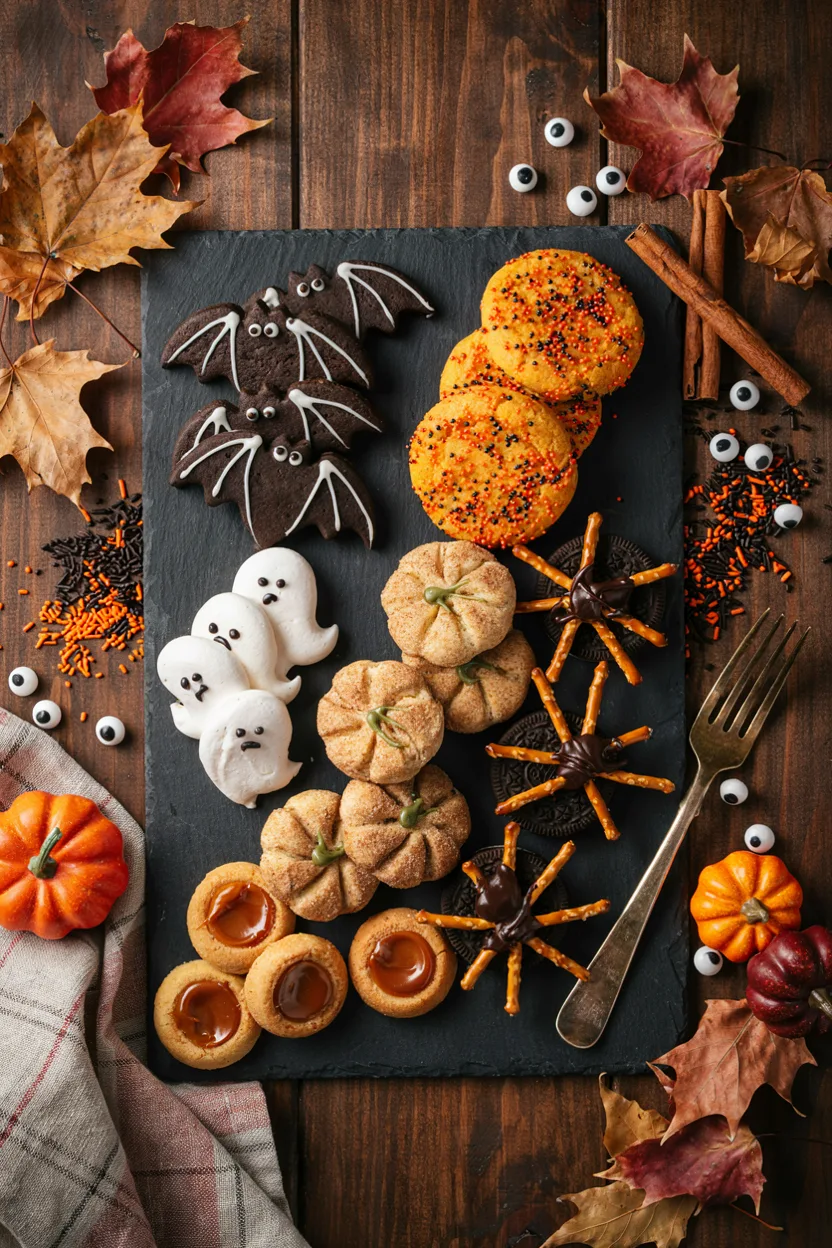
This collection spans no-bake shortcuts, classic cut-outs, fall-spiced favorites, and a few showstoppers worth the extra effort — each one a complete, real recipe you can bake tonight.
Here’s every recipe, organized so you can find your cookie fast.
This post may contain affiliate links which helps me keep this blog alive, questions? View the privacy policy.
Easy & Quick Halloween Cookies
1. Classic Halloween Sugar Cookies
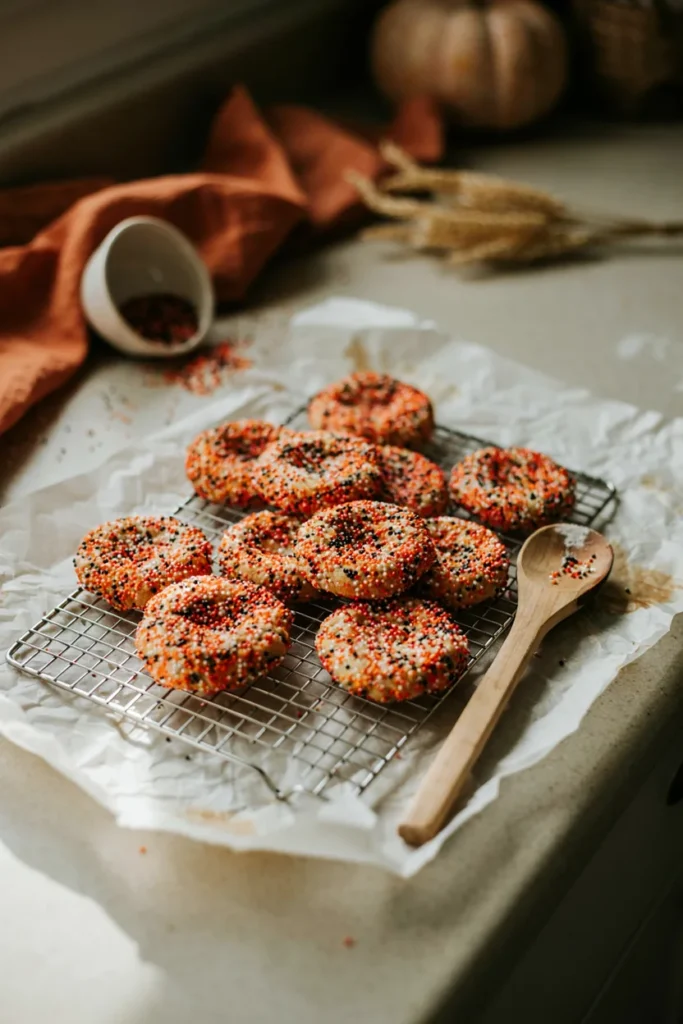
These start as a plain drop cookie and end up looking like a party the moment they hit the sprinkle bowl. The edges turn just crisp while the centers stay soft enough to dent with a thumb — the kind of cookie that disappears from the plate before it’s fully cooled.
Prep Time: 15 min | Cook Time: 10 min | Total Time: 25 min | Servings: 24 cookies | Difficulty: Easy
Ingredients
- 2 3/4 cups all-purpose flour
- 1 teaspoon baking soda
- 1/2 teaspoon salt
- 1 cup unsalted butter, softened
- 1 1/2 cups granulated sugar
- 1 large egg
- 1 teaspoon vanilla extract
- 1/2 cup orange and black sprinkles or nonpareils
Instructions
- Preheat the oven to 375°F and line two baking sheets with parchment paper.
- Whisk the flour, baking soda, and salt together in a medium bowl; set aside.
- In a large bowl, beat the butter and sugar together on medium speed for 3 minutes, until pale and fluffy.
- Beat in the egg and vanilla until fully combined.
- Add the flour mixture and mix on low speed just until no dry streaks remain.
- Scoop 1 1/2 tablespoons of dough per cookie, roll into a ball, then roll in the sprinkles to coat.
- Place the balls 2 inches apart on the prepared sheets and bake for 9–11 minutes, until the edges are just set and the centers still look slightly underdone.
- Cool on the sheet for 5 minutes, then transfer to a wire rack to finish cooling.
Baker’s Tip
Pull these at exactly 9 minutes if you want a soft, chewy center — the residual heat finishes the job on the tray.
Why You’ll Love It
Zero decorating skill required. The sprinkle roll does all the visual work while you’re still standing at the counter in your socks.
2. Nut-Free Sunbutter Jack-o’-Lantern Cookies

Built for the classroom party where one allergy list can shrink your options to almost nothing. The sunflower seed butter bakes up just as rich and craggy as a peanut butter cookie, and the fork-pressed ridges turn each one into a tiny jack-o’-lantern without a single cookie cutter.
Prep Time: 15 min | Cook Time: 10 min | Total Time: 25 min | Servings: 20 cookies | Difficulty: Easy
Ingredients
- 1 cup sunflower seed butter
- 1 cup packed brown sugar
- 1 large egg
- 1 teaspoon baking soda
- 1/2 teaspoon ground cinnamon
- Pinch of salt
- 1/2 cup orange candy melts, melted
- 20 mini chocolate chips (for faces)
Instructions
- Preheat the oven to 350°F and line two baking sheets with parchment paper.
- In a bowl, stir together the sunflower seed butter, brown sugar, egg, baking soda, cinnamon, and salt until a smooth dough forms.
- Roll the dough into 1-tablespoon balls and place 2 inches apart on the prepared sheets.
- Press each ball flat with a fork, turning 90 degrees for a second press to create a pumpkin-ridge crosshatch pattern.
- Bake for 8–10 minutes, until the edges are set and just beginning to brown.
- Cool completely on the sheet, then pipe orange candy melt outlines around the edge and press on a mini chocolate chip face.
Substitutions
Any allergy-safe seed or bean-based butter works here — just look for one with a similar thick, scoopable texture.
Best For
Nut-free classrooms, shared treat tables, and any party where you’re not sure who’s bringing what.
3. No-Bake Oreo Spider Cookies

No oven, no waiting on butter to soften — just a food processor and a bowl of melted chocolate standing between you and a plate of spiders. They’re eerie enough for a Halloween table and forgiving enough for a first-time baker.
Prep Time: 20 min | Cook Time: 0 min | Total Time: 35 min (includes chilling) | Servings: 16 cookies | Difficulty: Easy
Ingredients
- 24 Oreo cookies
- 8 ounces cream cheese, softened
- 8 ounces semisweet chocolate, melted
- 64 thin pretzel sticks, broken in half
- 32 candy eyes
Instructions
- Pulse the Oreos in a food processor until finely crushed.
- Add the cream cheese and pulse until the mixture forms a thick, moldable dough.
- Roll into 16 balls, place on a parchment-lined tray, and chill for 15 minutes.
- Dip each ball in the melted chocolate to coat, letting the excess drip off, and return to the tray.
- While the chocolate is still wet, press 8 pretzel-stick legs into each side and add 2 candy eyes.
- Chill for another 10 minutes, until the chocolate is fully set.
Baker’s Tip
Chilled hands make a mess of this dough — pop your palms under cold water for 30 seconds before rolling if the mixture feels sticky.
Good to Know
For more cookies-and-cream ideas beyond this one, our Oreo dessert recipes collection is worth a look.
4. Rice Krispie Witch Hat Cookies

These lean on the marshmallow-and-cereal formula everyone already trusts, just reshaped into something that belongs on a Halloween dessert table. No baking, no cracked icing, just sticky hands and a good sugar cone.
Prep Time: 20 min | Cook Time: 0 min | Total Time: 30 min (includes cooling) | Servings: 12 hats | Difficulty: Easy
Ingredients
- 6 cups crisp rice cereal
- 10 ounces mini marshmallows
- 3 tablespoons unsalted butter
- 12 ice cream sugar cones
- 1/2 cup purple or orange icing (for the hatbands)
- 12 small round candies (for the buckles)
Instructions
- Melt the butter in a large pot over low heat, then add the marshmallows and stir until fully melted.
- Remove from heat and fold in the cereal until evenly coated.
- Working quickly with buttered hands, press a small handful of the mixture into a flat 3-inch disc for each hat base.
- Press a sugar cone upright into the center of each disc to form the hat shape.
- Let cool completely, about 15 minutes, until firm.
- Pipe an icing hatband around the base of each cone and press on a candy buckle.
Make-Ahead Tip
Assemble the hats up to 2 days ahead and store uncovered at room temperature — the cereal base actually holds its shape better once it’s had time to set.
Why You’ll Love It
It’s the rare Halloween treat that survives a school bus ride without losing its shape.
Which Halloween Cookie Should You Bake First?
Not sure where to start? Use this quick guide to match a recipe to your time, skill level, and occasion.
| Recipe | Best For | Difficulty | Total Time |
|---|---|---|---|
| Classic Halloween Sugar Cookies | No-fuss weeknight baking | Easy | 25 min |
| Nut-Free Sunbutter Jack-o’-Lanterns | Allergy-safe classrooms | Easy | 25 min |
| No-Bake Oreo Spider Cookies | No oven, no problem | Easy | 35 min |
| Rice Krispie Witch Hat Cookies | Kids helping in the kitchen | Easy | 30 min |
| Black Cocoa Bat Cookies | Cut-out cookie fans | Medium | 60 min |
| Gingerbread Skeleton Cookies | Edible party favors | Medium | 90 min |
| Chocolate Crinkle Spiderweb Cookies | Chocolate lovers | Medium | 150 min |
| Mummy Chocolate Chip Cookies | Doctoring store-bought dough | Easy | 26 min |
| Pumpkin Spice Snickerdoodles | Fall flavor cravings | Easy | 26 min |
| Brown Butter Pumpkin Oatmeal Cookies | Cozy, bakery-style cookies | Medium | 33 min |
| Caramel Apple Thumbprint Cookies | Make-ahead freezer dough | Medium | 32 min |
| Peanut Butter Blossom Pumpkins | Classic crowd-pleasers | Easy | 25 min |
| Meringue Ghost Cookies | Showstopper dessert tables | Medium | 110 min |
| Candy Corn Sugar Cookie Bars | Feeding a crowd, minimal effort | Medium | 42 min |
| Red Velvet Vampire Bite Cookies | A dressier Halloween dessert | Easy | 25 min |
Classic Halloween Cookies with Character
5. Black Cocoa Bat Cookies

Black cocoa is the trick behind that midnight-black color you’ve seen on bakery Halloween cookies — no black food dye required. The flavor lands somewhere between an Oreo and dark chocolate, with a snap that holds a clean cut-out shape.
Prep Time: 20 min (plus 30 min chill) | Cook Time: 10 min | Total Time: 60 min | Servings: 24 cookies | Difficulty: Medium
Ingredients
- 2 1/4 cups all-purpose flour
- 1/2 cup black cocoa powder
- 1/2 teaspoon baking powder
- 1/4 teaspoon salt
- 3/4 cup unsalted butter, softened
- 3/4 cup granulated sugar
- 1 large egg
- 1 teaspoon vanilla extract
- White icing pen (for eyes)
Instructions
- Whisk together the flour, black cocoa, baking powder, and salt; set aside.
- Beat the butter and sugar together until light and creamy, about 2 minutes.
- Beat in the egg and vanilla until smooth.
- Add the dry ingredients and mix until a soft dough forms.
- Divide the dough into two discs, wrap, and chill for 30 minutes.
- Preheat the oven to 350°F and line two baking sheets with parchment.
- Roll the dough to 1/4-inch thickness and cut into bat shapes.
- Bake for 9–10 minutes, until the edges feel set. Cool completely on the sheet.
- Pipe two small dot eyes onto each bat with the icing pen.
Baker’s Tip
Chill the cut shapes on the tray for 10 minutes before baking — it stops the bat wings from spreading and blurring in the oven.
Why You’ll Love It
That true black color reads as bakery-level effort, but it comes from one pantry swap, not a decorating course.
6. Gingerbread Skeleton Cookies

Warm spice and a firm, snap-worthy texture make this dough the best possible canvas for detailed piping. The bone outlines take a little patience, but the finished cookie looks like it came from a bakery case, not a home kitchen.
Prep Time: 20 min (plus 1 hour chill) | Cook Time: 10 min | Total Time: 90 min | Servings: 20 cookies | Difficulty: Medium
Ingredients
- 3 cups all-purpose flour
- 1 teaspoon baking soda
- 2 teaspoons ground ginger
- 1 teaspoon ground cinnamon
- 1/2 teaspoon ground cloves
- 1/2 teaspoon salt
- 3/4 cup unsalted butter, softened
- 3/4 cup packed brown sugar
- 1/2 cup molasses
- 1 large egg
- 1 cup white royal icing
Instructions
- Whisk together the flour, baking soda, ginger, cinnamon, cloves, and salt; set aside.
- Beat the butter and brown sugar until fluffy, about 2 minutes.
- Beat in the molasses and egg until smooth.
- Add the dry ingredients and mix until a firm dough forms. Wrap and chill for 1 hour.
- Preheat the oven to 350°F and line two baking sheets with parchment.
- Roll the dough to 1/4-inch thickness and cut into skeleton or gingerbread-man shapes.
- Bake for 9–10 minutes, until the edges are firm. Cool completely on a wire rack.
- Fit the royal icing into a piping bag with a fine tip and pipe bone outlines and joints onto each cookie.
- Let the icing set for at least 20 minutes before stacking or serving.
Storage & Freezing
Unfrosted cookies freeze well for up to 2 months — pipe the bones fresh the day you plan to serve them for the cleanest lines.
Best For
Halloween party favors that double as edible decor on a dessert table.
7. Chocolate Crinkle Spiderweb Cookies

The crackle here isn’t decoration — it’s chemistry. A cold, oil-based dough rolled thick in powdered sugar splits open in the oven, leaving dark web-like fissures across a soft, brownie-textured center.
Prep Time: 20 min (plus 2 hours chill) | Cook Time: 12 min | Total Time: 150 min | Servings: 24 cookies | Difficulty: Medium
Ingredients
- 1 cup all-purpose flour
- 1/2 cup unsweetened cocoa powder
- 1 teaspoon baking powder
- 1/4 teaspoon salt
- 1/2 cup vegetable oil
- 1 cup granulated sugar
- 2 large eggs
- 1 teaspoon vanilla extract
- 1/2 cup powdered sugar (for rolling)
Instructions
- Whisk together the flour, cocoa powder, baking powder, and salt; set aside.
- In a separate bowl, whisk the oil, granulated sugar, eggs, and vanilla until smooth.
- Fold the dry ingredients into the wet ingredients until fully combined. Cover and chill for 2 hours.
- Preheat the oven to 350°F and line two baking sheets with parchment.
- Roll the dough into 1-tablespoon balls, then roll heavily in powdered sugar until fully coated.
- Place 2 inches apart and bake for 10–12 minutes, until the tops are cracked and the edges are set.
- Cool on the sheet for 5 minutes before transferring to a rack.
Baker’s Tip
Coat the dough balls in powdered sugar twice, with a 2-minute rest between coats — the thicker layer is what creates those deep, dramatic cracks.
Flavor Variation
Stir 1 teaspoon of espresso powder into the dry ingredients for a mocha edge that deepens the chocolate flavor without tasting like coffee.
8. Mummy Chocolate Chip Cookies

This one takes the cookie everyone already loves and gives it a two-minute Halloween costume. The base is a completely standard, bakery-style chocolate chip cookie — the mummy wrap happens entirely after baking.
Prep Time: 15 min | Cook Time: 11 min | Total Time: 26 min | Servings: 20 cookies | Difficulty: Easy
Ingredients
- 2 1/4 cups all-purpose flour
- 1 teaspoon baking soda
- 1 teaspoon salt
- 1 cup unsalted butter, softened
- 3/4 cup packed brown sugar
- 3/4 cup granulated sugar
- 2 large eggs
- 2 teaspoons vanilla extract
- 2 cups semisweet chocolate chips
- 1 cup white chocolate, melted (for wrapping)
- 20 candy eyes
Instructions
- Preheat the oven to 375°F and line two baking sheets with parchment paper.
- Whisk together the flour, baking soda, and salt; set aside.
- Beat the butter, brown sugar, and granulated sugar until fluffy, about 2 minutes.
- Beat in the eggs and vanilla until smooth.
- Mix in the dry ingredients until just combined, then fold in the chocolate chips.
- Scoop 2 tablespoons of dough per cookie, space 2 inches apart, and bake for 10–11 minutes, until the edges are golden and the centers look slightly underdone.
- Cool completely on a wire rack.
- Drizzle the melted white chocolate back and forth across each cookie in a zigzag “wrap” pattern, leaving a gap near the top.
- Press two candy eyes into the gap before the chocolate sets.
Why You’ll Love It
It’s the cookie you already know how to bake, dressed up just enough to earn its spot on a Halloween platter.
Good to Know
In a real time crunch, this wrap-and-eyes trick works just as well on a tube of store-bought cookie dough.
Fall-Spiced Halloween Cookies
9. Pumpkin Spice Snickerdoodles
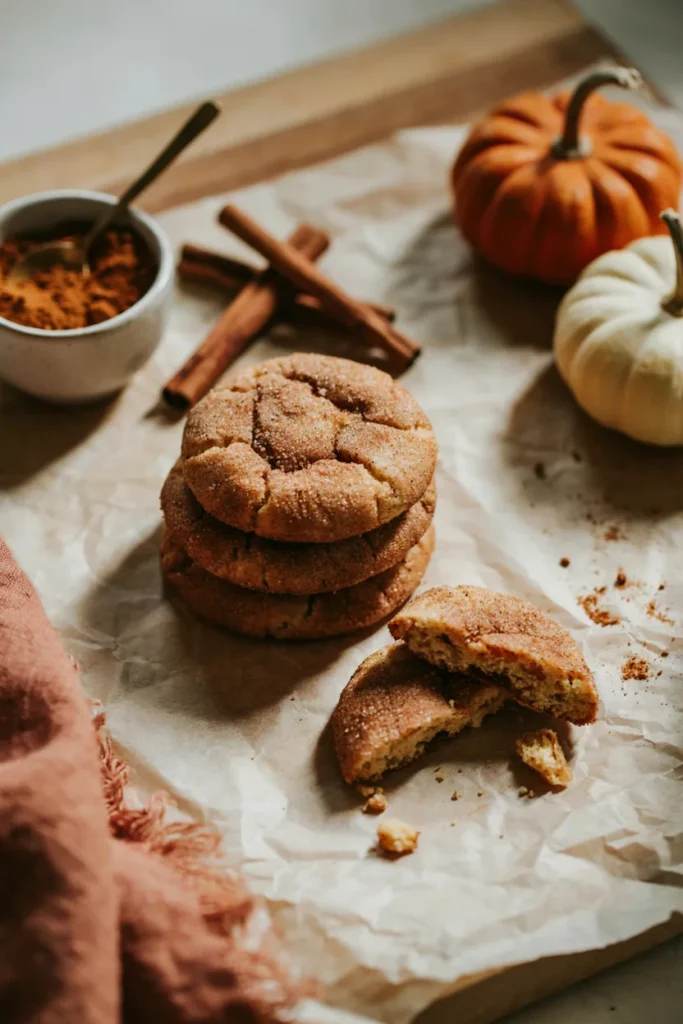
A classic snickerdoodle already has the cinnamon-sugar crackle Halloween baking loves — this version adds a warm hit of pumpkin spice to the coating so every bite tastes like the first cold morning of October.
Prep Time: 15 min | Cook Time: 11 min | Total Time: 26 min | Servings: 24 cookies | Difficulty: Easy
Ingredients
- 2 3/4 cups all-purpose flour
- 2 teaspoons cream of tartar
- 1 teaspoon baking soda
- 1/2 teaspoon salt
- 1 teaspoon pumpkin pie spice
- 1 cup unsalted butter, softened
- 1 1/2 cups granulated sugar
- 2 large eggs
- 1 teaspoon vanilla extract
- 1/4 cup granulated sugar (for coating)
- 2 teaspoons ground cinnamon (for coating)
- 1 teaspoon pumpkin pie spice (for coating)
Instructions
- Preheat the oven to 375°F and line two baking sheets with parchment paper.
- Whisk together the flour, cream of tartar, baking soda, salt, and pumpkin pie spice; set aside.
- Beat the butter and sugar until light and fluffy, about 3 minutes.
- Beat in the eggs and vanilla until smooth, then mix in the dry ingredients.
- In a small bowl, stir together the coating sugar, cinnamon, and pumpkin pie spice.
- Roll the dough into 1 1/2-tablespoon balls and roll each in the spiced sugar coating.
- Bake for 9–11 minutes, until the tops are crackled and the edges are set.
- Cool on the sheet for 5 minutes before transferring to a wire rack.
Baker’s Tip
Underbake by 30 seconds if you like a soft, doughy center — snickerdoodles firm up considerably as they cool.
Why You’ll Love It
All the familiar snickerdoodle crackle, with a spice mix that feels unmistakably fall.
10. Brown Butter Pumpkin Oatmeal Cookies
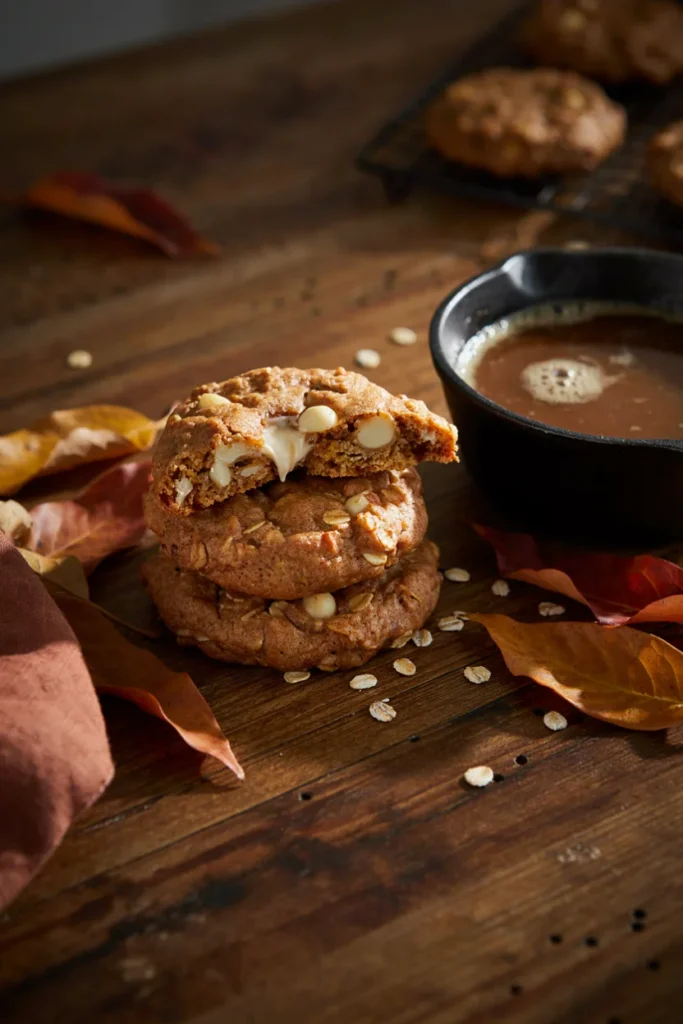
Browning the butter first is a five-minute detour that changes everything — it adds a nutty, toffee-like depth that makes the pumpkin taste richer instead of just sweeter. These bake up thick, chewy at the center, and slightly crisp at the edges.
Prep Time: 20 min | Cook Time: 13 min | Total Time: 33 min | Servings: 22 cookies | Difficulty: Medium
Ingredients
- 3/4 cup unsalted butter
- 1 cup old-fashioned rolled oats
- 1 1/2 cups all-purpose flour
- 1 teaspoon baking soda
- 1 teaspoon ground cinnamon
- 1/2 teaspoon ground nutmeg
- 1/4 teaspoon salt
- 1 cup packed brown sugar
- 1/2 cup pumpkin puree
- 1 large egg
- 1 teaspoon vanilla extract
- 3/4 cup white chocolate chips
Instructions
- Melt the butter in a light-colored saucepan over medium heat, swirling often, until it turns golden brown and smells nutty, about 5 minutes. Pour into a bowl to cool for 10 minutes.
- Preheat the oven to 350°F and line two baking sheets with parchment paper.
- Whisk together the oats, flour, baking soda, cinnamon, nutmeg, and salt; set aside.
- Whisk the brown sugar into the cooled brown butter, then whisk in the pumpkin puree, egg, and vanilla.
- Fold in the dry ingredients until just combined, then fold in the white chocolate chips.
- Scoop 2 tablespoons of dough per cookie, space 2 inches apart, and bake for 12–13 minutes, until the edges are set and the centers look slightly soft.
- Cool on the sheet for 10 minutes before transferring to a rack — they’re fragile while warm.
Substitutions
Swap the all-purpose flour 1:1 for a cup-for-cup gluten-free blend; the oats already make this dough sturdy enough to hold up.
Baker’s Tip
Let the pumpkin puree drain in a paper towel for 10 minutes before measuring — too much extra moisture leads to a cakey instead of chewy cookie. If you love pumpkin in cookie form, our pumpkin chocolate chip cookies are worth baking next.
11. Caramel Apple Thumbprint Cookies
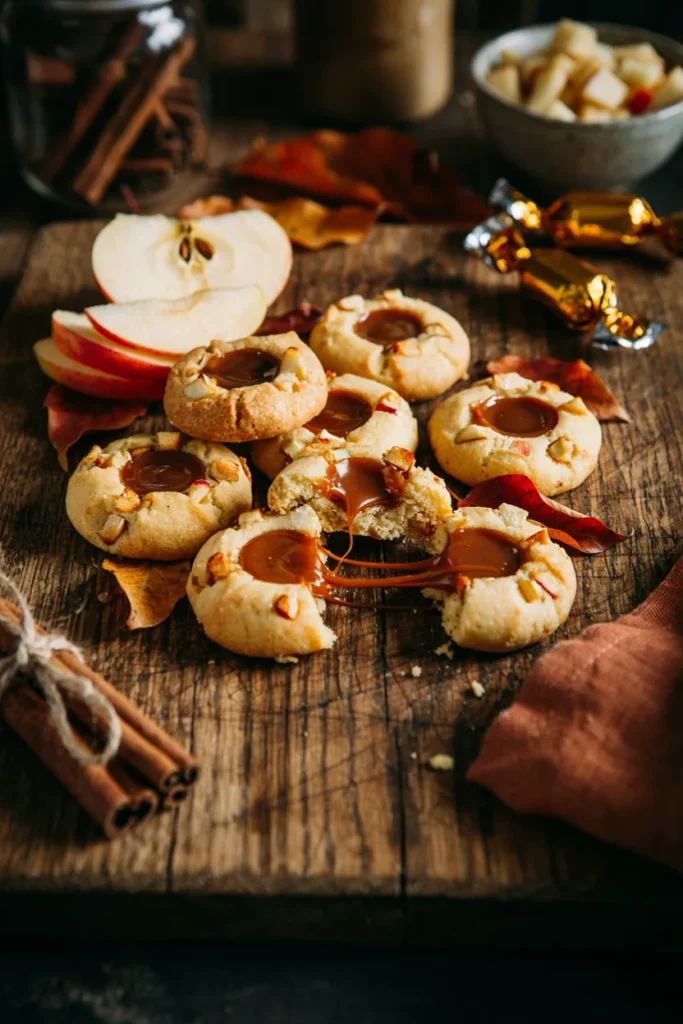
Two fall flavors, one bite. The dough itself is studded with finely diced apple, and the thumbprint well holds a pool of real caramel that stays soft and pull-apart gooey even after the cookie cools.
Prep Time: 20 min | Cook Time: 12 min | Total Time: 32 min | Servings: 20 cookies | Difficulty: Medium
Ingredients
- 1 cup unsalted butter, softened
- 2/3 cup granulated sugar
- 2 large egg yolks
- 1 teaspoon vanilla extract
- 2 1/4 cups all-purpose flour
- 1/4 teaspoon salt
- 1 cup finely diced apple, patted dry
- 20 soft caramel candies
- 2 tablespoons heavy cream
Instructions
- Preheat the oven to 350°F and line two baking sheets with parchment paper.
- Beat the butter and sugar together until light and fluffy, about 2 minutes.
- Beat in the egg yolks and vanilla until smooth.
- Mix in the flour and salt until just combined, then fold in the diced apple.
- Roll the dough into 1 1/2-tablespoon balls, space 2 inches apart, and press a deep thumbprint into the center of each.
- Bake for 10–12 minutes, until the edges are lightly golden. Re-press the thumbprint gently if it’s puffed shut, then cool completely.
- Melt the caramels with the heavy cream in a small saucepan over low heat, stirring until smooth.
- Spoon the warm caramel into each thumbprint well and let set for 15 minutes before serving.
Storage & Freezing
Shape and freeze the unbaked, un-filled dough balls for up to 2 months — bake straight from frozen, adding 2 extra minutes, then fill with fresh caramel.
Why You’ll Love It
It’s a caramel apple in cookie form, minus the stick and the sticky fingers.
12. Peanut Butter Blossom Pumpkins

The classic peanut butter blossom gets a shape change instead of a recipe change — same rich, slightly salty dough, just rolled in orange sugar and finished with a pretzel stem instead of a chocolate kiss.
Prep Time: 15 min | Cook Time: 10 min | Total Time: 25 min | Servings: 24 cookies | Difficulty: Easy
Ingredients
- 1/2 cup unsalted butter, softened
- 1/2 cup creamy peanut butter
- 1/2 cup granulated sugar
- 1/2 cup packed brown sugar
- 1 large egg
- 1 teaspoon vanilla extract
- 1 1/2 cups all-purpose flour
- 1 teaspoon baking soda
- 1/4 teaspoon salt
- 1/2 cup orange sanding sugar
- 24 small pretzel sticks
Instructions
- Preheat the oven to 375°F and line two baking sheets with parchment paper.
- Beat the butter, peanut butter, granulated sugar, and brown sugar together until fluffy, about 2 minutes.
- Beat in the egg and vanilla until smooth.
- Mix in the flour, baking soda, and salt until just combined.
- Roll the dough into 1 1/2-tablespoon balls and roll each in the orange sanding sugar.
- Space 2 inches apart and bake for 9–10 minutes, until the edges are set.
- While still warm, press a pretzel stick into the top of each cookie as a stem.
Best For
Peanut-loving crowds and last-minute classroom baking — the dough comes together in one bowl with no mixer required.
Baker’s Tip
Press the pretzel stem in within 2 minutes of the cookies coming out of the oven, while they’re still soft enough to hold it without cracking.
Easy Swaps for Every Halloween Cookie
A few common substitutions cover most of the dietary needs that come up around Halloween baking.
| Need | Swap | Works Well In |
|---|---|---|
| Nut-free | Sunflower seed butter for peanut/almond butter | Peanut Butter Blossom Pumpkins |
| Gluten-free | 1:1 cup-for-cup gluten-free flour blend | Brown Butter Pumpkin Oatmeal Cookies, Snickerdoodles |
| Egg-free | 1 tablespoon ground flaxseed + 3 tablespoons water per egg | Sugar Cookies, Chocolate Chip Mummies |
| Dairy-free | Plant-based butter, 1:1 by weight | Any recipe in this list except the meringues |
Always double-check labels on sprinkles, candy eyes, and pre-made icing — cross-contamination with nuts is common in packaged decorating supplies.
Showstopper Halloween Cookies
13. Meringue Ghost Cookies
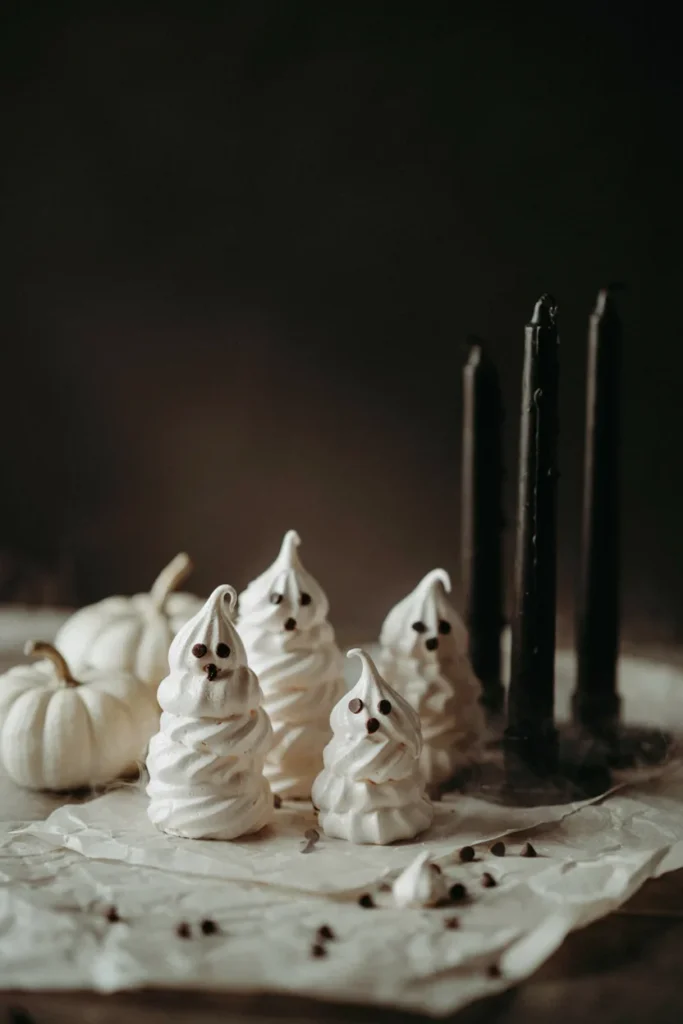
Light enough to nearly float off the plate, these meringues rely on nothing but whipped egg whites and sugar — no flour, no butter. The payoff is a crisp, delicate shell that shatters into a marshmallowy center with the first bite.
Prep Time: 20 min | Cook Time: 90 min | Total Time: 110 min | Servings: 30 cookies | Difficulty: Medium
Ingredients
- 4 large egg whites, room temperature
- 1/4 teaspoon cream of tartar
- 1 cup superfine sugar
- 1/2 teaspoon vanilla extract
- Mini chocolate chips (for eyes)
Instructions
- Preheat the oven to 200°F and line two baking sheets with parchment paper.
- Beat the egg whites and cream of tartar on medium speed until soft peaks form.
- With the mixer running, add the sugar 1 tablespoon at a time, beating well after each addition.
- Continue beating until the meringue is glossy and holds stiff, straight peaks, about 6–8 minutes total.
- Beat in the vanilla.
- Transfer to a piping bag fitted with a round tip and pipe ghost shapes, starting wide at the base and tapering to a point at the top.
- Press 2 mini chocolate chips into each ghost for eyes.
- Bake for 90 minutes, then turn off the oven and let the meringues sit inside, undisturbed, for at least 1 hour to finish drying.
Baker’s Tip
Bake these on a dry day if possible — humidity is the one thing that keeps meringue from crisping properly, no matter how careful the technique.
Good to Know
Keep the oven low and slow the entire time. Any higher heat browns the meringue and turns ghost-white into ghost-tan.
14. Candy Corn Sugar Cookie Bars
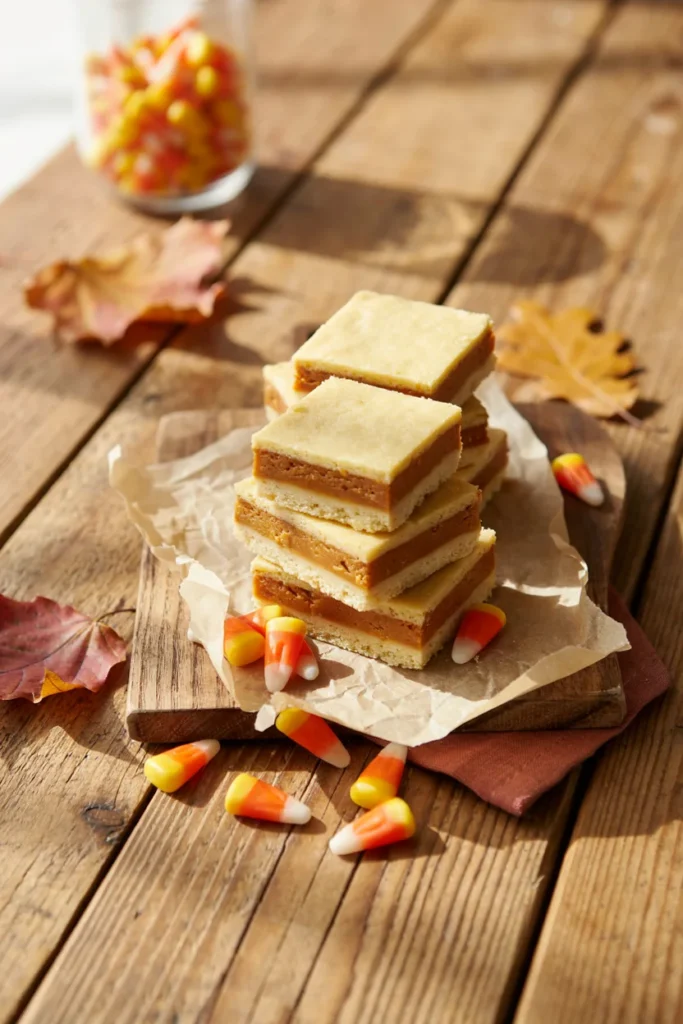
All the candy-corn color story, none of the individual cut-out shaping. Three tinted layers of the same buttery sugar cookie dough press into one pan and bake into a single bar you slice once, feeding a crowd in a fraction of the time.
Prep Time: 20 min | Cook Time: 22 min | Total Time: 42 min | Servings: 16 bars | Difficulty: Medium
Ingredients
- 2 1/2 cups all-purpose flour
- 1 teaspoon baking powder
- 1/2 teaspoon salt
- 3/4 cup unsalted butter, softened
- 1 cup granulated sugar
- 1 large egg
- 1 teaspoon vanilla extract
- Yellow and orange gel food coloring
Instructions
- Preheat the oven to 350°F and line a 9×13-inch pan with parchment paper.
- Whisk together the flour, baking powder, and salt; set aside.
- Beat the butter and sugar together until fluffy, about 2 minutes.
- Beat in the egg and vanilla, then mix in the dry ingredients until a soft dough forms.
- Divide the dough into three equal portions. Leave one plain, tint one yellow, and tint one orange.
- Press the yellow dough evenly into the bottom of the pan, then press the orange dough in an even layer on top, then the white dough on top of that.
- Bake for 20–22 minutes, until the top layer is set and just barely golden at the edges.
- Cool completely in the pan before lifting out and slicing into 16 bars.
Make-Ahead Tip
These bars actually improve after a day covered at room temperature — the layers settle and slice more cleanly than they do fresh from the oven.
Why You’ll Love It
One pan, one bake, and a candy corn look without a single cookie cutter in sight.
15. Red Velvet Vampire Bite Cookies

These read as elegant first and Halloween second — deep red cookies, a tangy cream cheese filling, and two small punctures dripping just enough red gel to make the theme clear without tipping into gimmick.
Prep Time: 15 min | Cook Time: 10 min | Total Time: 25 min | Servings: 22 sandwich cookies | Difficulty: Easy
Ingredients
- 1 3/4 cups all-purpose flour
- 2 tablespoons unsweetened cocoa powder
- 1/2 teaspoon baking soda
- 1/4 teaspoon salt
- 1/2 cup unsalted butter, softened
- 1 cup granulated sugar
- 1 large egg
- 1 teaspoon vanilla extract
- 1 tablespoon red gel food coloring
- 1 teaspoon white vinegar
- 4 ounces cream cheese, softened
- 1/4 cup powdered sugar
- Red decorating gel (for the “bite”)
Instructions
- Preheat the oven to 350°F and line two baking sheets with parchment paper.
- Whisk together the flour, cocoa powder, baking soda, and salt; set aside.
- Beat the butter and sugar together until fluffy, about 2 minutes.
- Beat in the egg, vanilla, red food coloring, and vinegar until smooth and evenly colored.
- Mix in the dry ingredients until just combined.
- Scoop 1 tablespoon of dough per cookie, space 2 inches apart, and bake for 9–10 minutes, until just set at the edges.
- Cool completely on a wire rack.
- Beat the cream cheese and powdered sugar together until smooth, then spread a thin layer on the flat side of half the cookies and sandwich with the remaining cookies.
- Press two small indents near the top edge of each sandwich cookie with a toothpick and let a drop of red decorating gel drip from each.
Baker’s Tip
Add the red food coloring gradually and check the shade against a white plate — gel colors deepen slightly as the dough bakes.
Flavor Variation
Swap the cream cheese filling for melted white chocolate ganache if you want a sweeter, less tangy bite.
Common Mistakes to Avoid
- Skipping the chill time on rolled dough: Cut-out shapes like the bats and skeletons will spread and blur without it — always chill before rolling and again briefly after cutting.
- Overbaking for color instead of doneness: Dark cocoa doughs already look “done” early. Pull them when the edges feel set, not when they look dark enough.
- Decorating cookies while they’re still warm: Icing and candy melts slide right off warm cookies. Wait until they’re fully cool to the touch.
- Overcrowding the baking sheet: Cookies spread more than they look like they will. Two inches of space prevents them from baking into one giant cookie.
- Not checking allergy needs before baking for a group: A quick check on nut, egg, and dairy restrictions before you start saves a wasted batch later.
- Using cold butter for creamed doughs: Butter that’s still cold won’t aerate properly, leading to dense, flat cookies instead of a soft, chewy texture.
How to Store These Halloween Cookies
Undecorated cookies keep well in an airtight container at room temperature for up to 5 days. Once iced or filled — like the gingerbread skeletons or vampire bite sandwiches — store in a single layer or between sheets of parchment so the decoration doesn’t smear.
Most doughs and baked cookies in this list freeze well for up to 2 months. Freeze baked cookies in a single layer first, then transfer to a bag once solid. Thaw at room temperature before decorating. The meringue ghosts are the exception — their texture holds best eaten within 2 days in a dry, airtight container, away from the fridge.
Frequently Asked Questions
What are the easiest Halloween cookies to make with kids?
No-bake options like the Oreo spiders and Rice Krispie witch hats are best for younger kids since there’s no hot oven involved. For baking together, the classic sugar cookies and peanut butter blossom pumpkins use simple one-bowl doughs kids can help mix and shape.
Can Halloween cookies be made ahead of time?
Yes. Most doughs in this roundup can be mixed, shaped, and refrigerated up to 2 days ahead, or frozen unbaked for up to 2 months. Bake fresh the day you need them, then decorate once fully cooled.
How do I make nut-free Halloween cookies for a school party?
Swap any peanut or almond butter for sunflower seed butter, and double-check that sprinkles, candy eyes, and premade icing are labeled nut-free — cross-contamination is common in packaged decorating supplies.
Can these Halloween cookies be frozen?
Most can, both as unbaked dough and as fully baked, undecorated cookies. Freeze in a single layer until solid, then transfer to a freezer bag. Add icing, candy melts, or fillings after thawing, not before.
How do you get a true black color in cookies without food dye?
Black cocoa powder is the trick — it’s a heavily Dutch-processed cocoa that bakes up nearly black with a flavor close to an Oreo cookie, no artificial coloring needed.
Do I need a piping bag to decorate Halloween cookies?
No. A small zip-top bag with the corner snipped off works for icing and candy melt drizzles on cookies like the mummies and bats. A piping bag only becomes worthwhile for detailed work like the gingerbread skeleton bones.
More Recipes You’ll Love