Snowflake Sugar Cookies
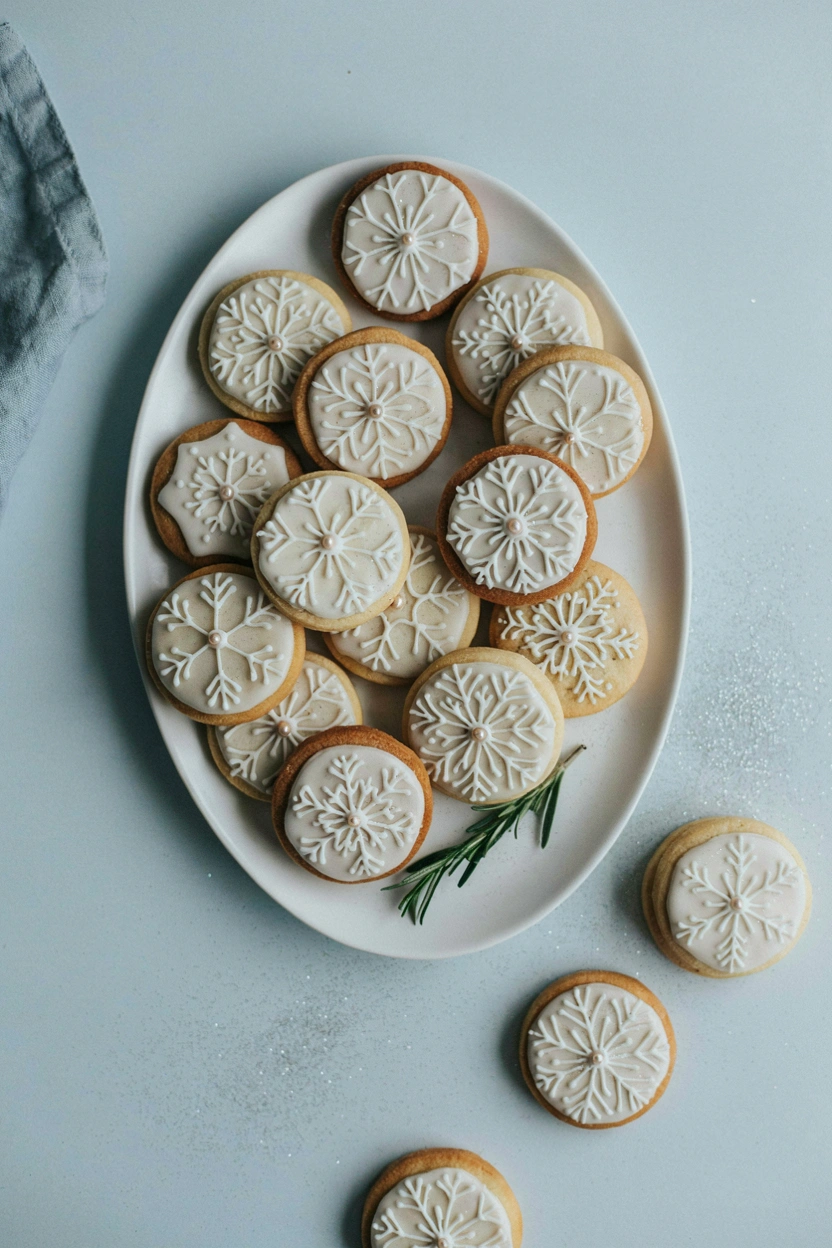
Snowflake Sugar Cookies bring a classic, elegant look to the Christmas cookie tray with a soft, buttery sugar cookie base and delicate white icing detail on top. Each cookie is cut into a snowflake shape, baked until just set, and decorated with piped royal icing lines that mimic the intricate pattern of real snow crystals. There’s no need for advanced piping skills, since even simple lines and dots create a beautiful, wintry effect. Set a batch out at a holiday party or pack them into a gift tin, and they’ll look like they came straight from a bakery case.
Why These Snowflake Sugar Cookies Belong on Your Christmas Dessert Table
Sugar cookies are a holiday staple, and the snowflake shape gives them an elegant, wintry look that fits any Christmas spread without needing bright colors or elaborate character designs. They pair especially well with a table that already has plenty of playful, colorful treats, offering a calmer, more classic option.
They’re also a great project for practicing piping skills, since the repetitive lines of a snowflake pattern are forgiving and look intentional even with some natural variation from cookie to cookie.
Best of all, the dough can be made ahead and the cookies decorated over a couple of days, which spreads out the work during a busy baking season.
Everything You’ll Need
The ingredient list is refreshingly short, and there’s plenty of room to customize it with what you already have on hand.
- 3 cups all-purpose flour
- 1 teaspoon baking powder
- 1/2 teaspoon salt
- 1 cup unsalted butter, softened
- 1 cup granulated sugar
- 1 large egg
- 1 teaspoon vanilla extract
- 3 cups powdered sugar, for the icing
- 3 to 4 tablespoons water or milk, for the icing
- Edible glitter or coarse sugar, for decorating
Ingredient Swaps & Easy Substitutions
All-purpose flour gives the best texture for a cookie that holds a crisp snowflake shape, but a 1:1 gluten-free flour blend can work in a pinch if needed. Royal icing made with meringue powder gives the cleanest, most precise piping lines, but a thinned powdered sugar glaze works too for a softer, less defined look. If you don’t have edible glitter, a light dusting of coarse sugar or a simple sprinkle of powdered sugar after the icing sets adds a similar sparkly finish.
Kitchen Tools You’ll Want
- Stand mixer or hand mixer
- Rolling pin
- Snowflake-shaped cookie cutters
- Baking sheets lined with parchment paper
- Piping bags with small round tips
- Wire cooling rack
Let’s Make Them
Once everything is prepped, these cookies come together in just a few easy stages.
- Mix the dry ingredients: Whisk together the flour, baking powder, and salt in a bowl and set aside.
- Cream the butter and sugar: Beat the butter and granulated sugar together until light and fluffy.
- Add the egg and vanilla: Beat in the egg, then mix in the vanilla extract.
- Combine: Gradually mix in the dry ingredients until a soft dough forms.
- Chill: Divide the dough in half, flatten into discs, and refrigerate for at least 1 hour.
- Roll and cut: Roll the chilled dough to about 1/4-inch thickness and cut out snowflake shapes.
- Bake: Bake at 350°F for 8 to 10 minutes, until the edges are just barely golden.
- Cool completely: Let the cookies cool fully on a wire rack before icing.
- Decorate: Pipe royal icing lines and dots in a snowflake pattern on each cookie, then add edible glitter or coarse sugar while the icing is still wet.
Host’s Tips for the Best Snowflake Sugar Cookies
Chill the dough long enough that it’s firm and easy to roll without sticking, since a dough that’s too soft can distort the delicate points of the snowflake shape. Let the cookies cool completely before icing, since warm cookies will melt the icing and blur the piped lines. Start with simple lines radiating out from the center before adding smaller details, which makes the pattern easier to keep even across all six points of the snowflake. Add any glitter or sugar while the icing is still wet so it has something to stick to.
Easy Ways to Make Them Your Own
Add a half teaspoon of almond extract along with the vanilla for a subtle bakery-style flavor. Swap the plain white icing for a pale blue tint for a frostier, icier look against the same snowflake pattern. For a simpler version, skip the detailed piping and just outline the edges of each cookie with icing, then add a dusting of edible glitter for a quick but still elegant finish.
Perfect Occasions & What to Serve Alongside
These cookies are perfect for holiday cookie exchanges, formal dessert tables, and gift tins for neighbors and coworkers who appreciate a classic, elegant treat. They also pair beautifully with more colorful, playful cookies on a mixed holiday platter. Serve them alongside tea, coffee, or hot cocoa, or add them to a dessert board next to truffles and gingerbread houses.
Make-Ahead & Serving Notes
The dough can be made up to 3 days ahead and kept covered in the fridge, or frozen for up to 2 months before rolling and baking. Baked, undecorated cookies keep well in an airtight container for up to a week, or in the freezer for up to 2 months. Once iced, store the cookies in a single layer or with parchment paper between layers so the icing doesn’t stick or smudge.
Still have a question? Here are a few of the most common ones readers ask before making these Snowflake Sugar Cookies.
Why did my cookies spread and lose their snowflake shape?
This usually means the dough wasn’t chilled long enough or the butter was too warm when mixed in. Chill the dough for a full hour, or longer if your kitchen runs warm, before rolling and cutting.
How do I get crisp, clean icing lines?
Use a small round piping tip and keep the icing at a medium consistency, thick enough to hold a line but thin enough to flow smoothly. Practice on a piece of parchment paper first if you’re new to piping detailed patterns.
Can I make the dough ahead of time?
Yes, the dough can be made up to 3 days in advance and kept covered in the refrigerator, or frozen for up to 2 months. Thaw refrigerated dough at room temperature for a few minutes if it’s too firm to roll.
Why is my icing too thin to hold a line?
This usually means too much water or milk was added. Add powdered sugar a tablespoon at a time to thicken the icing back up until it holds its shape when piped.
Can I freeze the decorated cookies?
It’s best to freeze these before icing, since royal icing can crack or become sticky after thawing. Bake and freeze the plain cookies, then thaw and decorate closer to when you plan to serve them.
More Christmas treats worth making:
- Christmas M&M Cookie Bars
- Santa Hat Cheesecake Bites
- Santa Hat Brownies
- Melted Snowman Cupcakes
- Reindeer Rice Krispie Treats
- Mini Gingerbread Houses
- Reindeer Cupcakes
- Classic Cut-Out Sugar Cookies
- Grinch Cupcakes
Ingredients
Method
- Whisk together the flour, baking powder, and salt; set aside.
- Beat the butter and sugar together until light and fluffy.
- Beat in the egg, then mix in the vanilla.
- Gradually mix in the dry ingredients until a soft dough forms.
- Divide the dough in half, flatten, and refrigerate for at least 1 hour.
- Roll to 1/4-inch thickness and cut into snowflake shapes.
- Bake at 350°F for 8 to 10 minutes, until edges are just golden.
- Cool completely, then pipe royal icing in a snowflake pattern and add glitter or sugar while wet.